Field Value Package @cometchat/chat-uikit-reactPeer deps react >=18, react-dom >=18, @astrojs/reactInit CometChatUIKit.init(UIKitSettings) — must resolve before login()Login CometChatUIKit.login("UID") — must resolve before rendering componentsOrder init() → login() → render. Breaking this order = blank screenAuth Key Dev/testing only. Use Auth Token in production SSR CometChat requires browser APIs — use client:only="react" directive on Astro islands CSS import "@cometchat/chat-uikit-react/css-variables.css" in your React islandCalling Optional. Install @cometchat/calls-sdk-javascript to enable Other frameworks React.js · Next.js · React Router
Overview This guide walks you through integrating CometChat into an Astro application using React islands. You’ll learn how to leverage Astro’s island architecture with partial hydration, use the correct client directives for browser-only components, and configure the React integration.
Time estimate: 15 minutes
Difficulty: IntermediateCometChat UI Kit requires browser APIs (window, WebSocket, document). In Astro, always load CometChat components using the client:only="react" directive so they only render client-side. Using client:load will cause SSR errors.
Prerequisites
Node.js v16+ and npm/yarn installed
CometChat Dashboard account with App ID, Auth Key, and RegionBasic familiarity with Astro’s component model and island architecture
Auth Key is for development only. In production, generate Auth Tokens server-side via the REST API and use loginWithAuthToken() Steps Step 1: Create an Astro Project npm create astro@latest my-chat-app cd my-chat-app
pnpm create astro@latest my-chat-app
cd my-chat-app
yarn create astro my-chat-app
cd my-chat-app
When prompted, select your preferences. This guide assumes you’re using TypeScript.
Step 2: Add React Integration Add the React integration to Astro:
This automatically updates your astro.config.mjs. Verify it includes the React integration:
import { defineConfig } from "astro/config" ; import react from "@astrojs/react" ; export default defineConfig ({ integrations: [ react ()] , }) ;
Step 3: Install the UI Kit npm install @cometchat/chat-uikit-react
yarn add @cometchat/chat-uikit-react
This installs the UI Kit and its dependency @cometchat/chat-sdk-javascript automatically.
Optional: Enable Voice/Video Calling
If you want voice/video calling capabilities, also install the Calls SDK: npm install @cometchat/calls-sdk-javascript
The UI Kit will automatically detect and enable calling features when this package is present. Step 4: Create Constants File Create a constants file for your CometChat credentials:
src/lib/cometchat-constants.ts
export const COMETCHAT_CONSTANTS = { APP_ID: "APP_ID" , // Replace with your App ID REGION: "REGION" , // Replace with your Region (us, eu, in) AUTH_KEY: "AUTH_KEY" , // Replace with your Auth Key (dev only) };
Step 5: Create the React Island Component In Astro, CometChat components must live inside a React island. Create a React component that handles initialization, authentication, and rendering:
src/components/CometChatIsland.tsx
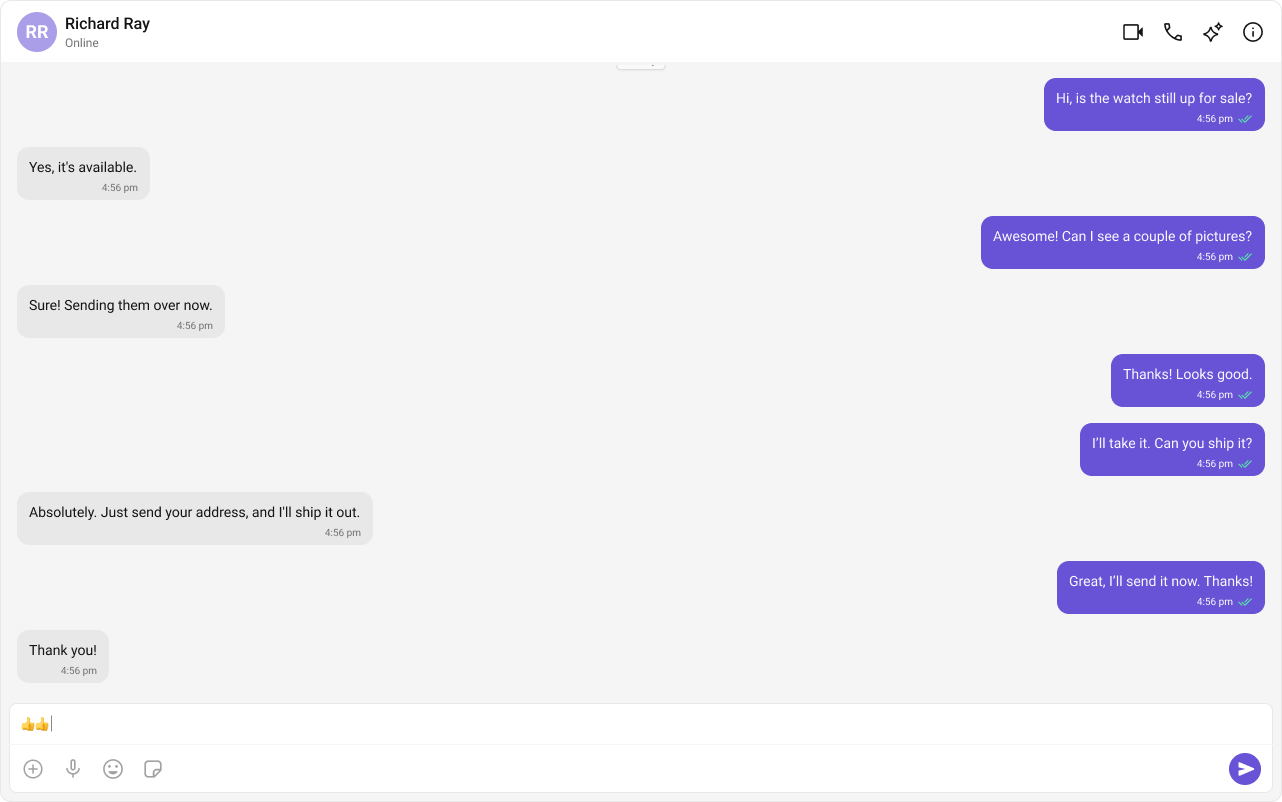
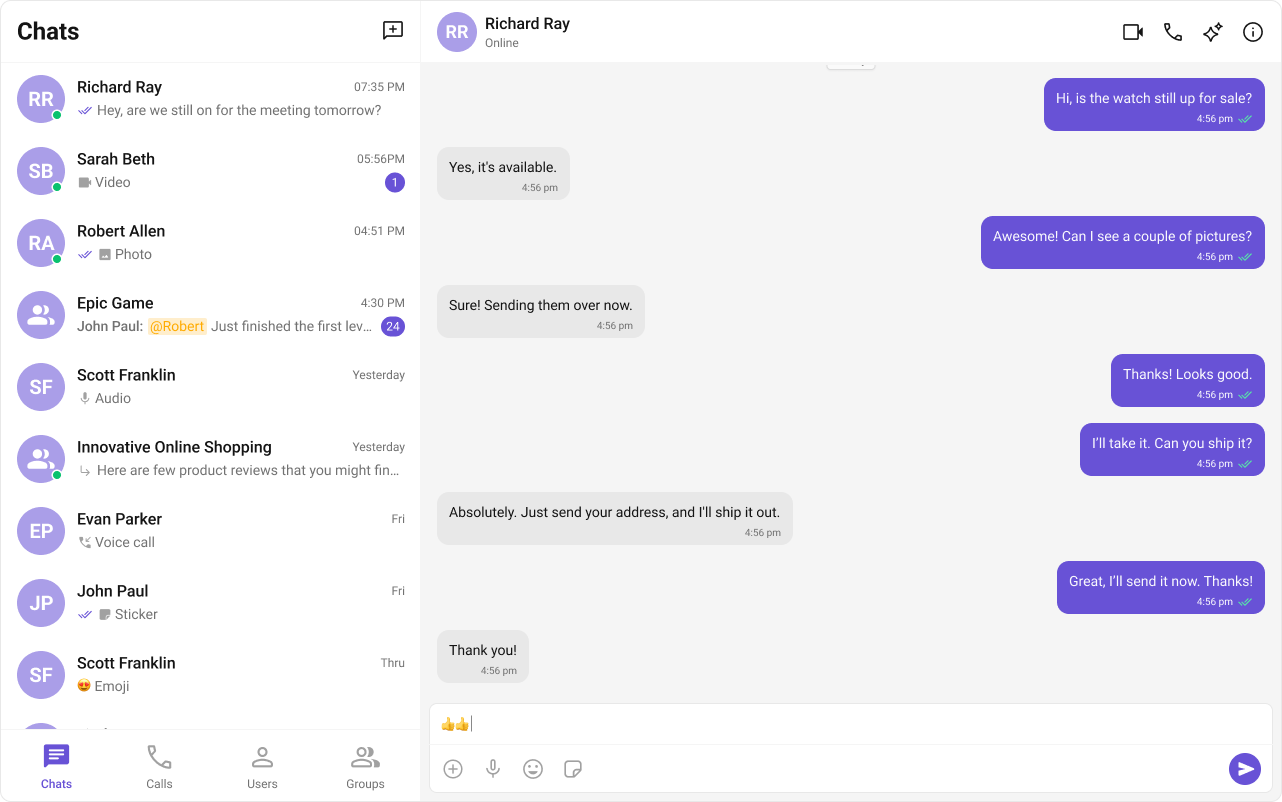
import { useEffect , useState } from "react" ; import { CometChat } from "@cometchat/chat-sdk-javascript" ; import { CometChatUIKit , UIKitSettingsBuilder , CometChatConversationsWithMessages , } from "@cometchat/chat-uikit-react" ; import "@cometchat/chat-uikit-react/css-variables.css" ; import { COMETCHAT_CONSTANTS } from "../lib/cometchat-constants" ; const UID = "cometchat-uid-1" ; // Replace with your actual UID export default function CometChatIsland () { const [ user , setUser ] = useState < CometChat . User | null >( null ); const [ isLoading , setIsLoading ] = useState ( true ); const [ error , setError ] = useState < string | null >( null ); useEffect (() => { const initCometChat = async () => { try { const UIKitSettings = new UIKitSettingsBuilder () . setAppId ( COMETCHAT_CONSTANTS . APP_ID ) . setRegion ( COMETCHAT_CONSTANTS . REGION ) . setAuthKey ( COMETCHAT_CONSTANTS . AUTH_KEY ) . subscribePresenceForAllUsers () . build (); await CometChatUIKit . init ( UIKitSettings ); console . log ( "CometChat UI Kit initialized successfully." ); const loggedInUser = await CometChatUIKit . getLoggedinUser (); if ( loggedInUser ) { setUser ( loggedInUser ); } else { const authenticatedUser = await CometChatUIKit . login ( UID ); console . log ( "Login Successful:" , authenticatedUser ); setUser ( authenticatedUser ); } } catch ( err ) { console . error ( "CometChat initialization/login failed:" , err ); setError ( "Failed to initialize chat. Please check your credentials." ); } finally { setIsLoading ( false ); } }; initCometChat (); }, []); if ( isLoading ) { return < div style = { { padding: "2rem" } } > Loading chat... </ div > ; } if ( error ) { return < div style = { { padding: "2rem" , color: "red" } } > { error } </ div > ; } if ( ! user ) { return < div style = { { padding: "2rem" } } > Login failed. Please check your credentials. </ div > ; } return ( < div style = { { width: "100%" , height: "100vh" } } > < CometChatConversationsWithMessages /> </ div > ); }
Key points:
CSS is imported directly in the React component (not in Astro global styles)
All initialization happens inside useEffect (client-side only)
State gates rendering until authentication completes
Step 6: Add Global Styles Create or update your global CSS to ensure proper layout:
html , body { margin : 0 ; padding : 0 ; height : 100 % ; }
Step 7: Use the Island in an Astro Page Create an Astro page that renders the React island with the client:only="react" directive:
--- import Layout from "../layouts/Layout.astro" ; import CometChatIsland from "../components/CometChatIsland" ; --- < Layout title = "Chat" > < CometChatIsland client:only = "react" /> </ Layout >
You must use client:only="react" — not client:load or client:visible. CometChat requires browser APIs that don’t exist during SSR. Using client:load will cause “window is not defined” errors.
Run your app:
Navigate to /chat to see your chat interface.
Complete Example export const COMETCHAT_CONSTANTS = { APP_ID: "APP_ID" , // Replace with your App ID REGION: "REGION" , // Replace with your Region (us, eu, in) AUTH_KEY: "AUTH_KEY" , // Replace with your Auth Key (dev only) };
import { useEffect , useState } from "react" ; import { CometChat } from "@cometchat/chat-sdk-javascript" ; import { CometChatUIKit , UIKitSettingsBuilder , CometChatConversationsWithMessages , } from "@cometchat/chat-uikit-react" ; import "@cometchat/chat-uikit-react/css-variables.css" ; import { COMETCHAT_CONSTANTS } from "../lib/cometchat-constants" ; const UID = "cometchat-uid-1" ; // Replace with your actual UID export default function CometChatIsland () { const [ user , setUser ] = useState < CometChat . User | null >( null ); const [ isLoading , setIsLoading ] = useState ( true ); const [ error , setError ] = useState < string | null >( null ); useEffect (() => { const initCometChat = async () => { try { const UIKitSettings = new UIKitSettingsBuilder () . setAppId ( COMETCHAT_CONSTANTS . APP_ID ) . setRegion ( COMETCHAT_CONSTANTS . REGION ) . setAuthKey ( COMETCHAT_CONSTANTS . AUTH_KEY ) . subscribePresenceForAllUsers () . build (); await CometChatUIKit . init ( UIKitSettings ); console . log ( "CometChat UI Kit initialized successfully." ); const loggedInUser = await CometChatUIKit . getLoggedinUser (); if ( loggedInUser ) { setUser ( loggedInUser ); } else { const authenticatedUser = await CometChatUIKit . login ( UID ); console . log ( "Login Successful:" , authenticatedUser ); setUser ( authenticatedUser ); } } catch ( err ) { console . error ( "CometChat initialization/login failed:" , err ); setError ( "Failed to initialize chat. Please check your credentials." ); } finally { setIsLoading ( false ); } }; initCometChat (); }, []); if ( isLoading ) { return < div style = { { padding: "2rem" } } > Loading chat... </ div > ; } if ( error ) { return < div style = { { padding: "2rem" , color: "red" } } > { error } </ div > ; } if ( ! user ) { return < div style = { { padding: "2rem" } } > Login failed. Please check your credentials. </ div > ; } return ( < div style = { { width: "100%" , height: "100vh" } } > < CometChatConversationsWithMessages /> </ div > ); }
--- import Layout from "../layouts/Layout.astro" ; import CometChatIsland from "../components/CometChatIsland" ; --- < Layout title = "Chat" > < CometChatIsland client:only = "react" /> </ Layout >
--- import "../styles/globals.css" ; interface Props { title : string ; } const { title } = Astro . props ; --- < ! doctype html > < html lang = "en" > < head > < meta charset = "UTF-8" /> < meta name = "viewport" content = "width=device-width" /> < title > { title } </ title > </ head > < body > < slot /> </ body > </ html >
html , body { margin : 0 ; padding : 0 ; height : 100 % ; } * { box-sizing : border-box ; }
import { defineConfig } from "astro/config" ; import react from "@astrojs/react" ; export default defineConfig ({ integrations: [ react ()] , }) ;
Astro-Specific Considerations Island Architecture (Partial Hydration) Astro uses an “islands architecture” where most of the page is static HTML, and only interactive components (islands) are hydrated with JavaScript. CometChat components are interactive islands that require full client-side rendering.
┌─────────────────────────────────────────┐
│  Static Astro Page (HTML)               │
│  ┌───────────────────────────────────┐  │
│  │  CometChat Island (React)         │  │
│  │  - Hydrated client-side only      │  │
│  │  - Uses browser APIs              │  │
│  │  - Full interactivity             │  │
│  └───────────────────────────────────┘  │
└─────────────────────────────────────────┘
client:only=“react” vs client:load Directive Behavior CometChat Compatible? client:only="react"Skips SSR entirely, renders only on client ✅ Yes client:loadRenders on server, hydrates on client ❌ No (SSR errors) client:visibleHydrates when visible in viewport ❌ No (SSR errors) client:idleHydrates when browser is idle ❌ No (SSR errors)
Always use client:only="react" for CometChat components because they require browser APIs (window, WebSocket, document) that don’t exist during server-side rendering.
<!-- ✅ Correct: Skips SSR entirely --> < CometChatIsland client:only = "react" /> <!-- ❌ Wrong: Will cause "window is not defined" error --> < CometChatIsland client:load />
Why client:load Won’t Work client:load tells Astro to:
Render the component on the server (SSR)
Send the HTML to the browser
Hydrate the component with JavaScript
Step 1 fails because CometChat uses browser APIs:
window for global stateWebSocket for real-time messagingdocument for DOM manipulationlocalStorage for session persistence
These APIs don’t exist in Node.js, causing SSR to fail.
React Integration Setup The React integration must be configured in astro.config.mjs:
import { defineConfig } from "astro/config" ; import react from "@astrojs/react" ; export default defineConfig ({ integrations: [ react ()] , }) ;
This enables:
JSX/TSX file support
React component rendering
Client directives for React components
CSS Import Location In Astro, import CometChat CSS inside your React island component, not in global Astro styles:
src/components/CometChatIsland.tsx
// ✅ Correct: Import in React component import "@cometchat/chat-uikit-react/css-variables.css" ;
/* ❌ Wrong: @import in Astro global CSS may not work correctly */ @import url ( "@cometchat/chat-uikit-react/css-variables.css" );
Common Patterns Conversation List + Message View Two-panel layout with conversation list on the left and messages on the right:
src/components/ConversationsIsland.tsx
import { useEffect , useState } from "react" ; import { CometChat } from "@cometchat/chat-sdk-javascript" ; import { CometChatUIKit , UIKitSettingsBuilder , CometChatConversationsWithMessages , } from "@cometchat/chat-uikit-react" ; import "@cometchat/chat-uikit-react/css-variables.css" ; import { COMETCHAT_CONSTANTS } from "../lib/cometchat-constants" ; const UID = "cometchat-uid-1" ; export default function ConversationsIsland () { const [ user , setUser ] = useState < CometChat . User | null >( null ); const [ isLoading , setIsLoading ] = useState ( true ); useEffect (() => { const init = async () => { const settings = new UIKitSettingsBuilder () . setAppId ( COMETCHAT_CONSTANTS . APP_ID ) . setRegion ( COMETCHAT_CONSTANTS . REGION ) . setAuthKey ( COMETCHAT_CONSTANTS . AUTH_KEY ) . subscribePresenceForAllUsers () . build (); await CometChatUIKit . init ( settings ); const loggedIn = await CometChatUIKit . getLoggedinUser (); setUser ( loggedIn || await CometChatUIKit . login ( UID )); setIsLoading ( false ); }; init (); }, []); if ( isLoading ) return < div > Loading... </ div > ; if ( ! user ) return < div > Login failed </ div > ; return ( < div style = { { width: "100%" , height: "100vh" } } > < CometChatConversationsWithMessages /> </ div > ); }
One-to-One Chat Single chat window for direct messaging:
src/components/DirectChatIsland.tsx
import { useEffect , useState } from "react" ; import { CometChat } from "@cometchat/chat-sdk-javascript" ; import { CometChatUIKit , UIKitSettingsBuilder , CometChatMessages , } from "@cometchat/chat-uikit-react" ; import "@cometchat/chat-uikit-react/css-variables.css" ; import { COMETCHAT_CONSTANTS } from "../lib/cometchat-constants" ; interface Props { targetUserId : string ; } const UID = "cometchat-uid-1" ; export default function DirectChatIsland ({ targetUserId } : Props ) { const [ currentUser , setCurrentUser ] = useState < CometChat . User | null >( null ); const [ targetUser , setTargetUser ] = useState < CometChat . User | null >( null ); const [ isLoading , setIsLoading ] = useState ( true ); useEffect (() => { const init = async () => { const settings = new UIKitSettingsBuilder () . setAppId ( COMETCHAT_CONSTANTS . APP_ID ) . setRegion ( COMETCHAT_CONSTANTS . REGION ) . setAuthKey ( COMETCHAT_CONSTANTS . AUTH_KEY ) . subscribePresenceForAllUsers () . build (); await CometChatUIKit . init ( settings ); const loggedIn = await CometChatUIKit . getLoggedinUser (); setCurrentUser ( loggedIn || await CometChatUIKit . login ( UID )); const target = await CometChat . getUser ( targetUserId ); setTargetUser ( target ); setIsLoading ( false ); }; init (); }, [ targetUserId ]); if ( isLoading ) return < div > Loading... </ div > ; if ( ! currentUser || ! targetUser ) return < div > Failed to load chat </ div > ; return ( < div style = { { width: "100%" , height: "100vh" } } > < CometChatMessages user = { targetUser } /> </ div > ); }
src/pages/chat/[userId].astro
--- import Layout from "../../layouts/Layout.astro" ; import DirectChatIsland from "../../components/DirectChatIsland" ; const { userId } = Astro . params ; --- < Layout title = "Direct Chat" > < DirectChatIsland client:only = "react" targetUserId = { userId ! } /> </ Layout >
Tab-Based Chat Tabbed navigation with Chat, Users, and Calls:
src/components/TabbedChatIsland.tsx
import { useEffect , useState } from "react" ; import { CometChat } from "@cometchat/chat-sdk-javascript" ; import { CometChatUIKit , UIKitSettingsBuilder , CometChatConversationsWithMessages , CometChatUsersWithMessages , CometChatCallLogs , } from "@cometchat/chat-uikit-react" ; import "@cometchat/chat-uikit-react/css-variables.css" ; import { COMETCHAT_CONSTANTS } from "../lib/cometchat-constants" ; type Tab = "chat" | "users" | "calls" ; const UID = "cometchat-uid-1" ; export default function TabbedChatIsland () { const [ user , setUser ] = useState < CometChat . User | null >( null ); const [ isLoading , setIsLoading ] = useState ( true ); const [ activeTab , setActiveTab ] = useState < Tab >( "chat" ); useEffect (() => { const init = async () => { const settings = new UIKitSettingsBuilder () . setAppId ( COMETCHAT_CONSTANTS . APP_ID ) . setRegion ( COMETCHAT_CONSTANTS . REGION ) . setAuthKey ( COMETCHAT_CONSTANTS . AUTH_KEY ) . subscribePresenceForAllUsers () . build (); await CometChatUIKit . init ( settings ); const loggedIn = await CometChatUIKit . getLoggedinUser (); setUser ( loggedIn || await CometChatUIKit . login ( UID )); setIsLoading ( false ); }; init (); }, []); if ( isLoading ) return < div > Loading... </ div > ; if ( ! user ) return < div > Login failed </ div > ; const tabStyle = { padding: "0.75rem 1.5rem" , border: "none" , background: "transparent" , cursor: "pointer" , borderBottom: "2px solid transparent" , }; const activeStyle = { ... tabStyle , borderBottomColor: "#3b82f6" , color: "#3b82f6" , }; return ( < div style = { { display: "flex" , flexDirection: "column" , height: "100vh" } } > < nav style = { { display: "flex" , borderBottom: "1px solid #eee" } } > < button style = { activeTab === "chat" ? activeStyle : tabStyle } onClick = { () => setActiveTab ( "chat" ) } > Chat </ button > < button style = { activeTab === "users" ? activeStyle : tabStyle } onClick = { () => setActiveTab ( "users" ) } > Users </ button > < button style = { activeTab === "calls" ? activeStyle : tabStyle } onClick = { () => setActiveTab ( "calls" ) } > Calls </ button > </ nav > < div style = { { flex: 1 } } > { activeTab === "chat" && < CometChatConversationsWithMessages /> } { activeTab === "users" && < CometChatUsersWithMessages /> } { activeTab === "calls" && < CometChatCallLogs /> } </ div > </ div > ); }
UIKitSettingsBuilder Options const UIKitSettings = new UIKitSettingsBuilder () . setAppId ( COMETCHAT_CONSTANTS . APP_ID ) . setRegion ( COMETCHAT_CONSTANTS . REGION ) . setAuthKey ( COMETCHAT_CONSTANTS . AUTH_KEY ) . subscribePresenceForAllUsers () // Subscribe to presence for all users . subscribePresenceForFriends () // Or subscribe only for friends . subscribePresenceForRoles ([ "admin" ]) // Or subscribe for specific roles . autoEstablishSocketConnection ( true ) // Auto-connect WebSocket (default: true) . build ();
Production Authentication In production, generate Auth Tokens server-side and use loginWithAuthToken(): import type { APIRoute } from "astro" ; export const POST : APIRoute = async ({ request }) => { const { userId } = await request . json (); // Generate auth token via CometChat REST API const response = await fetch ( `https:// ${ import . meta . env . COMETCHAT_APP_ID } .api- ${ import . meta . env . COMETCHAT_REGION } .cometchat.io/v3/users/ ${ userId } /auth_tokens` , { method: "POST" , headers: { "Content-Type" : "application/json" , "apiKey" : import . meta . env . COMETCHAT_API_KEY , }, } ); const data = await response . json (); return new Response ( JSON . stringify ({ authToken: data . data . authToken }), { headers: { "Content-Type" : "application/json" }, }); };
src/components/CometChatIsland.tsx
// In your island component const response = await fetch ( "/api/auth" , { method: "POST" , body: JSON . stringify ({ userId: currentUserId }), }); const { authToken } = await response . json (); await CometChatUIKit . loginWithAuthToken ( authToken );
Multiple Islands on One Page You can have multiple CometChat islands on the same page, but they share the same CometChat session: src/pages/dashboard.astro
--- import Layout from "../layouts/Layout.astro" ; import ConversationListIsland from "../components/ConversationListIsland" ; import UserListIsland from "../components/UserListIsland" ; --- < Layout title = "Dashboard" > < div style = "display: grid; grid-template-columns: 1fr 1fr; height: 100vh;" > < ConversationListIsland client:only = "react" /> < UserListIsland client:only = "react" /> </ div > </ Layout >
Each island initializes CometChat independently. Consider creating a shared initialization utility to avoid redundant init calls.
Common Issues init() must resolve before you call login(). If you call login() before init completes, it will fail silently.
Issue Solution ”window is not defined” error Use client:only="react" instead of client:load Blank screen after login Ensure init() completes before login(), and login() completes before rendering Missing styles Import @cometchat/chat-uikit-react/css-variables.css in your React island component ”App ID not found” error Verify your App ID, Region, and Auth Key match your CometChat Dashboard Components not filling viewport Add height: 100% to html, body in global CSS Island not rendering Verify React integration is configured in astro.config.mjs Props not passing to island Ensure props are serializable (no functions or complex objects)
For more troubleshooting help, see the Troubleshooting Guide or contact CometChat Support .
Next Steps