Field Value Package @cometchat/chat-uikit-reactPeer deps react >=18, react-dom >=18, rxjs ^7.8.1Init CometChatUIKit.init(UIKitSettings) — must resolve before login()Login CometChatUIKit.login("UID") — must resolve before rendering componentsOrder init() → login() → render. Breaking this order = blank screenAuth Key Dev/testing only. Use Auth Token in production SSR CometChat requires browser APIs — use dynamic import with ssr: false CSS @import url("@cometchat/chat-uikit-react/css-variables.css"); in global CSSCalling Optional. Install @cometchat/calls-sdk-javascript to enable Other frameworks React.js · React Router · Astro
Overview This guide walks you through integrating CometChat into a Next.js application. You’ll learn how to handle SSR constraints, use the App Router with client components, and implement dynamic imports for browser-only code.
Time estimate: 15 minutes
Difficulty: IntermediateCometChat UI Kit requires browser APIs (window, WebSocket, document). In Next.js, always load CometChat components client-side using dynamic imports with ssr: false or the "use client" directive.
Prerequisites
Node.js v16+ and npm/yarn installed
CometChat Dashboard account with App ID, Auth Key, and RegionBasic familiarity with Next.js App Router or Pages Router
Auth Key is for development only. In production, generate Auth Tokens server-side via the REST API and use loginWithAuthToken() Steps Step 1: Create a Next.js Project npx create-next-app@latest my-chat-app --typescript cd my-chat-app
When prompted, select your preferences. This guide works with both App Router (default) and Pages Router.
Step 2: Install the UI Kit npm install @cometchat/chat-uikit-react
yarn add @cometchat/chat-uikit-react
This installs the UI Kit and its dependency @cometchat/chat-sdk-javascript automatically.
Optional: Enable Voice/Video Calling
If you want voice/video calling capabilities, also install the Calls SDK: npm install @cometchat/calls-sdk-javascript
The UI Kit will automatically detect and enable calling features when this package is present. Step 3: Add CSS Import Add this line at the top of your global CSS file:
@import url ( "@cometchat/chat-uikit-react/css-variables.css" ); html , body { height : 100 % ; }
@import url ( "@cometchat/chat-uikit-react/css-variables.css" ); html , body { height : 100 % ; } #__next { height : 100 % ; }
Without the CSS import, components will render with broken or missing styles. Without the height rules, the chat UI won’t fill the viewport.
Step 4: Create Constants File Create a constants file for your CometChat credentials:
lib/cometchat-constants.ts
export const COMETCHAT_CONSTANTS = { APP_ID: "APP_ID" , // Replace with your App ID REGION: "REGION" , // Replace with your Region (us, eu, in) AUTH_KEY: "AUTH_KEY" , // Replace with your Auth Key (dev only) };
Step 5: Create CometChat Client Component CometChat requires browser APIs, so you must use the "use client" directive and handle initialization client-side.
components/CometChatClient.tsx
"use client" ; import { useEffect , useState } from "react" ; import { CometChat } from "@cometchat/chat-sdk-javascript" ; import { CometChatUIKit , UIKitSettingsBuilder , CometChatConversationsWithMessages , } from "@cometchat/chat-uikit-react" ; import { COMETCHAT_CONSTANTS } from "@/lib/cometchat-constants" ; const UID = "cometchat-uid-1" ; // Replace with your actual UID export default function CometChatClient () { const [ user , setUser ] = useState < CometChat . User | null >( null ); const [ isLoading , setIsLoading ] = useState ( true ); const [ error , setError ] = useState < string | null >( null ); useEffect (() => { const initCometChat = async () => { try { const UIKitSettings = new UIKitSettingsBuilder () . setAppId ( COMETCHAT_CONSTANTS . APP_ID ) . setRegion ( COMETCHAT_CONSTANTS . REGION ) . setAuthKey ( COMETCHAT_CONSTANTS . AUTH_KEY ) . subscribePresenceForAllUsers () . build (); await CometChatUIKit . init ( UIKitSettings ); console . log ( "CometChat UI Kit initialized successfully." ); const loggedInUser = await CometChatUIKit . getLoggedinUser (); if ( loggedInUser ) { setUser ( loggedInUser ); } else { const authenticatedUser = await CometChatUIKit . login ( UID ); console . log ( "Login Successful:" , authenticatedUser ); setUser ( authenticatedUser ); } } catch ( err ) { console . error ( "CometChat initialization/login failed:" , err ); setError ( "Failed to initialize chat. Please check your credentials." ); } finally { setIsLoading ( false ); } }; initCometChat (); }, []); if ( isLoading ) { return < div style = { { padding: "2rem" } } > Loading chat... </ div > ; } if ( error ) { return < div style = { { padding: "2rem" , color: "red" } } > { error } </ div > ; } if ( ! user ) { return < div style = { { padding: "2rem" } } > Login failed. Please check your credentials. </ div > ; } return ( < div style = { { width: "100%" , height: "100vh" } } > < CometChatConversationsWithMessages /> </ div > ); }
Key points:
"use client" directive marks this as a client componentAll CometChat initialization happens inside useEffect (client-side only)
State gates rendering until authentication completes
Step 6: Use the Component in Your Page import CometChatClient from "@/components/CometChatClient" ; export default function ChatPage () { return < CometChatClient /> ; }
import dynamic from "next/dynamic" ; const CometChatClient = dynamic ( () => import ( "@/components/CometChatClient" ), { ssr: false , loading : () => < div > Loading chat... </ div > } ); export default function ChatPage () { return < CometChatClient /> ; }
Run your app:
Navigate to /chat to see your chat interface.
Complete Example lib/cometchat-constants.ts
components/CometChatClient.tsx
app/chat/page.tsx (App Router)
pages/chat.tsx (Pages Router)
app/globals.css
export const COMETCHAT_CONSTANTS = { APP_ID: "APP_ID" , // Replace with your App ID REGION: "REGION" , // Replace with your Region (us, eu, in) AUTH_KEY: "AUTH_KEY" , // Replace with your Auth Key (dev only) };
"use client" ; import { useEffect , useState } from "react" ; import { CometChat } from "@cometchat/chat-sdk-javascript" ; import { CometChatUIKit , UIKitSettingsBuilder , CometChatConversationsWithMessages , } from "@cometchat/chat-uikit-react" ; import { COMETCHAT_CONSTANTS } from "@/lib/cometchat-constants" ; const UID = "cometchat-uid-1" ; // Replace with your actual UID export default function CometChatClient () { const [ user , setUser ] = useState < CometChat . User | null >( null ); const [ isLoading , setIsLoading ] = useState ( true ); const [ error , setError ] = useState < string | null >( null ); useEffect (() => { const initCometChat = async () => { try { const UIKitSettings = new UIKitSettingsBuilder () . setAppId ( COMETCHAT_CONSTANTS . APP_ID ) . setRegion ( COMETCHAT_CONSTANTS . REGION ) . setAuthKey ( COMETCHAT_CONSTANTS . AUTH_KEY ) . subscribePresenceForAllUsers () . build (); await CometChatUIKit . init ( UIKitSettings ); console . log ( "CometChat UI Kit initialized successfully." ); const loggedInUser = await CometChatUIKit . getLoggedinUser (); if ( loggedInUser ) { setUser ( loggedInUser ); } else { const authenticatedUser = await CometChatUIKit . login ( UID ); console . log ( "Login Successful:" , authenticatedUser ); setUser ( authenticatedUser ); } } catch ( err ) { console . error ( "CometChat initialization/login failed:" , err ); setError ( "Failed to initialize chat. Please check your credentials." ); } finally { setIsLoading ( false ); } }; initCometChat (); }, []); if ( isLoading ) { return < div style = { { padding: "2rem" } } > Loading chat... </ div > ; } if ( error ) { return < div style = { { padding: "2rem" , color: "red" } } > { error } </ div > ; } if ( ! user ) { return < div style = { { padding: "2rem" } } > Login failed. Please check your credentials. </ div > ; } return ( < div style = { { width: "100%" , height: "100vh" } } > < CometChatConversationsWithMessages /> </ div > ); }
import CometChatClient from "@/components/CometChatClient" ; export default function ChatPage () { return < CometChatClient /> ; }
import dynamic from "next/dynamic" ; const CometChatClient = dynamic ( () => import ( "@/components/CometChatClient" ), { ssr: false , loading : () => < div > Loading chat... </ div > } ); export default function ChatPage () { return < CometChatClient /> ; }
@import url ( "@cometchat/chat-uikit-react/css-variables.css" ); html , body { height : 100 % ; } * { margin : 0 ; padding : 0 ; box-sizing : border-box ; }
Next.js-Specific Considerations App Router vs Pages Router Aspect App Router Pages Router Client components Use "use client" directive Use dynamic() with ssr: false File location app/ directorypages/ directoryDefault rendering Server Components Client-side CometChat approach Client component with directive Dynamic import
The “use client” Directive In App Router, add "use client" at the top of any file that uses CometChat:
"use client" ; import { CometChatConversationsWithMessages } from "@cometchat/chat-uikit-react" ; // ... rest of component
This tells Next.js to render the component client-side only, avoiding SSR errors from browser API usage.
Dynamic Imports with ssr: false In Pages Router (or when you need more control), use Next.js dynamic imports:
import dynamic from "next/dynamic" ; const CometChatClient = dynamic ( () => import ( "@/components/CometChatClient" ), { ssr: false , loading : () => < div > Loading chat... </ div > } );
This completely skips server-side rendering for the component, preventing hydration mismatches.
Hydration Considerations CometChat components must render identically on client and server. Since CometChat requires browser APIs, you must:
Never render CometChat components during SSR — Use "use client" or ssr: falseGate rendering on client-side state — Use useState and useEffect to ensure components only render after hydrationHandle loading states — Show a placeholder during initialization
// ✅ Good: Conditional rendering after client-side init const [ isClient , setIsClient ] = useState ( false ); useEffect (() => { setIsClient ( true ); }, []); if ( ! isClient ) return < div > Loading... </ div > ; return < CometChatConversationsWithMessages /> ;
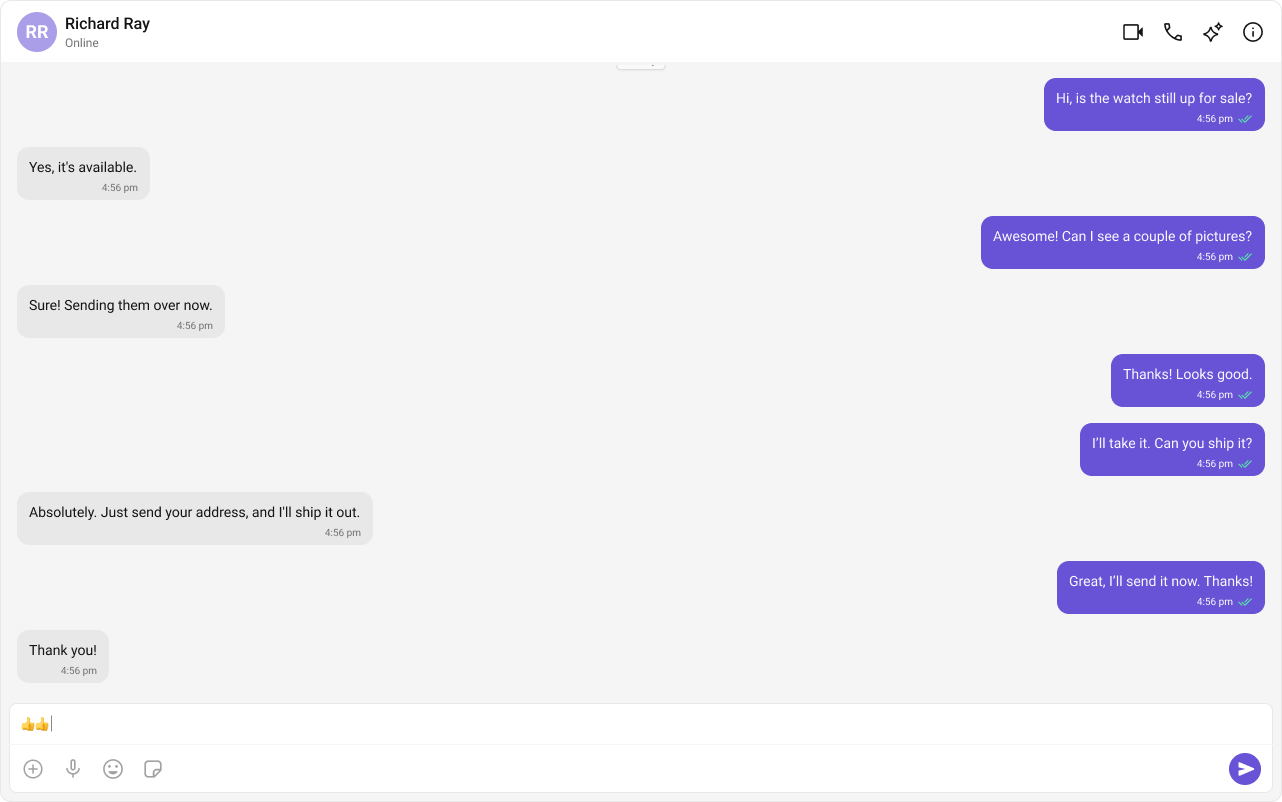
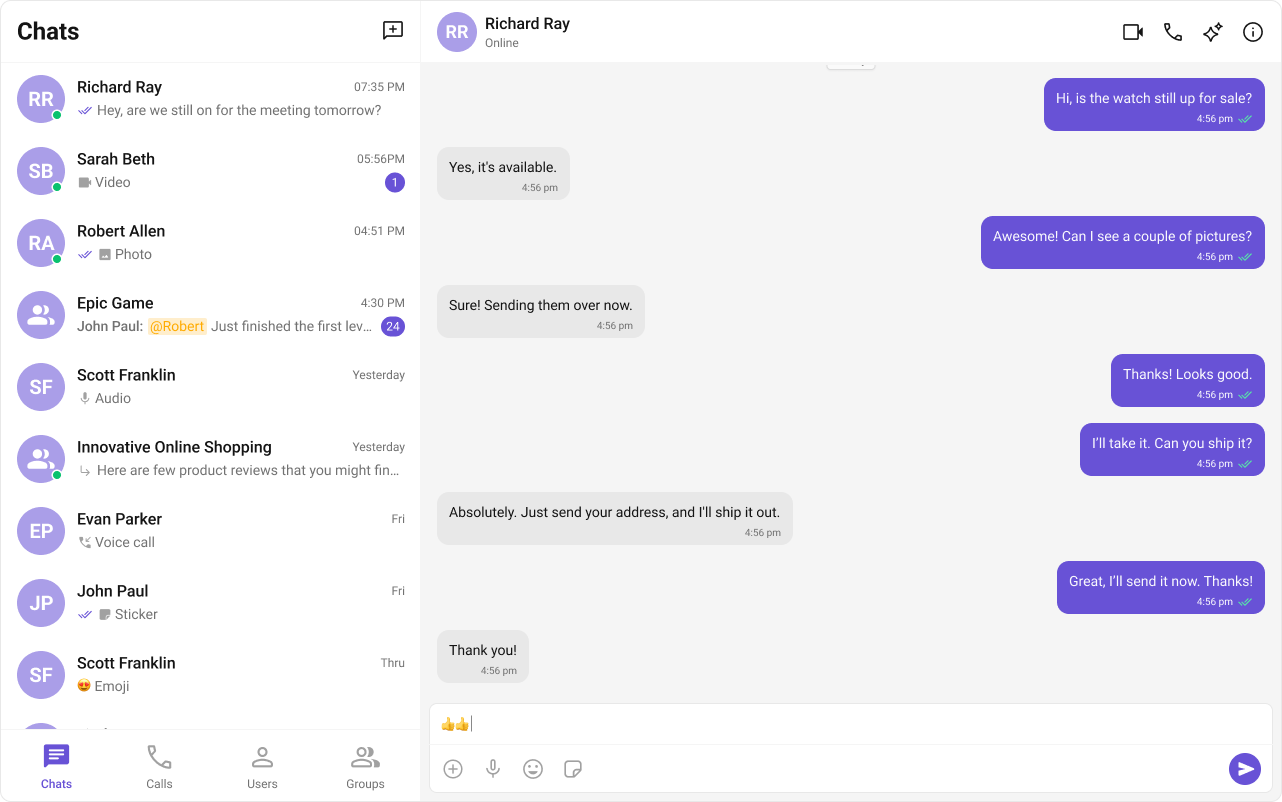
Common Patterns Conversation List + Message View Two-panel layout with conversation list on the left and messages on the right:
"use client" ; import { CometChatConversationsWithMessages } from "@cometchat/chat-uikit-react" ; export default function ChatLayout () { return ( < div style = { { width: "100%" , height: "100vh" } } > < CometChatConversationsWithMessages /> </ div > ); }
One-to-One Chat with Route Parameters Use Next.js route parameters to open a specific chat:
app/chat/[userId]/page.tsx
"use client" ; import { useEffect , useState } from "react" ; import { CometChat } from "@cometchat/chat-sdk-javascript" ; import { CometChatMessages } from "@cometchat/chat-uikit-react" ; export default function DirectChatPage ({ params } : { params : { userId : string } }) { const [ user , setUser ] = useState < CometChat . User | null >( null ); useEffect (() => { CometChat . getUser ( params . userId ). then ( setUser ); }, [ params . userId ]); if ( ! user ) return < div > Loading... </ div > ; return ( < div style = { { width: "100%" , height: "100vh" } } > < CometChatMessages user = { user } /> </ div > ); }
import dynamic from "next/dynamic" ; import { useRouter } from "next/router" ; const DirectChat = dynamic ( () => import ( "@/components/DirectChat" ), { ssr: false } ); export default function DirectChatPage () { const router = useRouter (); const { userId } = router . query ; if ( ! userId || typeof userId !== "string" ) return < div > Loading... </ div > ; return < DirectChat userId = { userId } /> ; }
Tab-Based Chat with Next.js Navigation Use Next.js Link for tab navigation:
components/TabbedChat.tsx
"use client" ; import { useState } from "react" ; import { CometChatConversationsWithMessages , CometChatUsersWithMessages , CometChatCallLogs , } from "@cometchat/chat-uikit-react" ; type Tab = "chat" | "users" | "calls" ; export default function TabbedChat () { const [ activeTab , setActiveTab ] = useState < Tab >( "chat" ); return ( < div style = { { display: "flex" , flexDirection: "column" , height: "100vh" } } > < nav style = { { display: "flex" , gap: "1rem" , padding: "1rem" , borderBottom: "1px solid #eee" } } > < button onClick = { () => setActiveTab ( "chat" ) } > Chat </ button > < button onClick = { () => setActiveTab ( "users" ) } > Users </ button > < button onClick = { () => setActiveTab ( "calls" ) } > Calls </ button > </ nav > < div style = { { flex: 1 } } > { activeTab === "chat" && < CometChatConversationsWithMessages /> } { activeTab === "users" && < CometChatUsersWithMessages /> } { activeTab === "calls" && < CometChatCallLogs /> } </ div > </ div > ); }
UIKitSettingsBuilder Options const UIKitSettings = new UIKitSettingsBuilder () . setAppId ( COMETCHAT_CONSTANTS . APP_ID ) . setRegion ( COMETCHAT_CONSTANTS . REGION ) . setAuthKey ( COMETCHAT_CONSTANTS . AUTH_KEY ) . subscribePresenceForAllUsers () // Subscribe to presence for all users . subscribePresenceForFriends () // Or subscribe only for friends . subscribePresenceForRoles ([ "admin" ]) // Or subscribe for specific roles . autoEstablishSocketConnection ( true ) // Auto-connect WebSocket (default: true) . build ();
Production Authentication In production, generate Auth Tokens server-side and use loginWithAuthToken(): app/api/auth/cometchat/route.ts
import { NextResponse } from "next/server" ; export async function POST ( request : Request ) { const { userId } = await request . json (); // Generate auth token via CometChat REST API const response = await fetch ( `https:// ${ process . env . COMETCHAT_APP_ID } .api- ${ process . env . COMETCHAT_REGION } .cometchat.io/v3/users/ ${ userId } /auth_tokens` , { method: "POST" , headers: { "Content-Type" : "application/json" , "apiKey" : process . env . COMETCHAT_API_KEY ! , }, } ); const data = await response . json (); return NextResponse . json ({ authToken: data . data . authToken }); }
components/CometChatClient.tsx
// In your client component const response = await fetch ( "/api/auth/cometchat" , { method: "POST" , body: JSON . stringify ({ userId: currentUserId }), }); const { authToken } = await response . json (); await CometChatUIKit . loginWithAuthToken ( authToken );
Common Issues init() must resolve before you call login(). If you call login() before init completes, it will fail silently. Note that in Next.js, init() may return undefined if settings are invalid.
Issue Solution ”window is not defined” error Use "use client" directive or dynamic() with ssr: false Hydration mismatch Ensure CometChat components only render client-side; use state to gate rendering Blank screen after login Ensure init() completes before login(), and login() completes before rendering Missing styles Add @import url("@cometchat/chat-uikit-react/css-variables.css"); to your global CSS ”App ID not found” error Verify your App ID, Region, and Auth Key match your CometChat Dashboard Components not filling viewport Add height: 100% to html, body, and #__next (Pages Router) in CSS
For more troubleshooting help, see the Troubleshooting Guide or contact CometChat Support .
Next Steps